We are in the Christmas spirit at my house (:
I cut a bunch of tree branches from my parents pine trees, I love the extra touch it adds everywhere.
Check out how we made this Merry & Bright Marquee Sign
This Christmas countdown was a last year project. Super easy and one of my favorite Christmas decorations to put up each year.
I did this wood slice sign the same way I did my Autumn sign. I actually just flipped the slice of wood over and used the back so I didn't have to buy another one. Smart huh? ;)
I used the same tracing technique for these wood slice Christmas ornaments.
Christmas decorating is the best hope you guys enjoyed this post as much as I did! (:
Sunday, December 14, 2014
Wednesday, November 12, 2014
Merry & Bright Marquee Sign
I am super excited to share this project with you guys! Christmas is right around the corner and I have a few projects I want to accomplish. I can now check this one off my list.
First I traced my letters onto a thick piece of poster board. My husband then cut them out for me since he has the patience to do that haha
You need a 2' x 4' piece of wood and a 1" x 10' piece. Cut the 1" x 10' to boarder the back of your 2' x 4' this will hide all of your wires and make your sign look polished an finished. I decided to spray my sign white but you could choose any color that fits your home.
Once the letters were cut out I coated them in mod podge and sprinkled glitter on them. This is probably the hardest part. It isn't very hard necessarily but it is time consuming if you're like me and want your letters to look nice and thick with glitter. Turn your letters upside down to sprinkle off the excess but know that you can reapply the mod podge again and add more glitter once your letters are dry.
Once our letters were dry we used wood glue to attache the letters to our board.
Let the letters dry over night then you can drill your holes where you want your lights, string the lights through the back, tape down the cords so you won't be able to see them and you're finished! Isn't this the cutest Christmas sign ever!? Just a few more weeks and I will show you what it looks like with my Christmas decorations yay!
Sunday, October 5, 2014
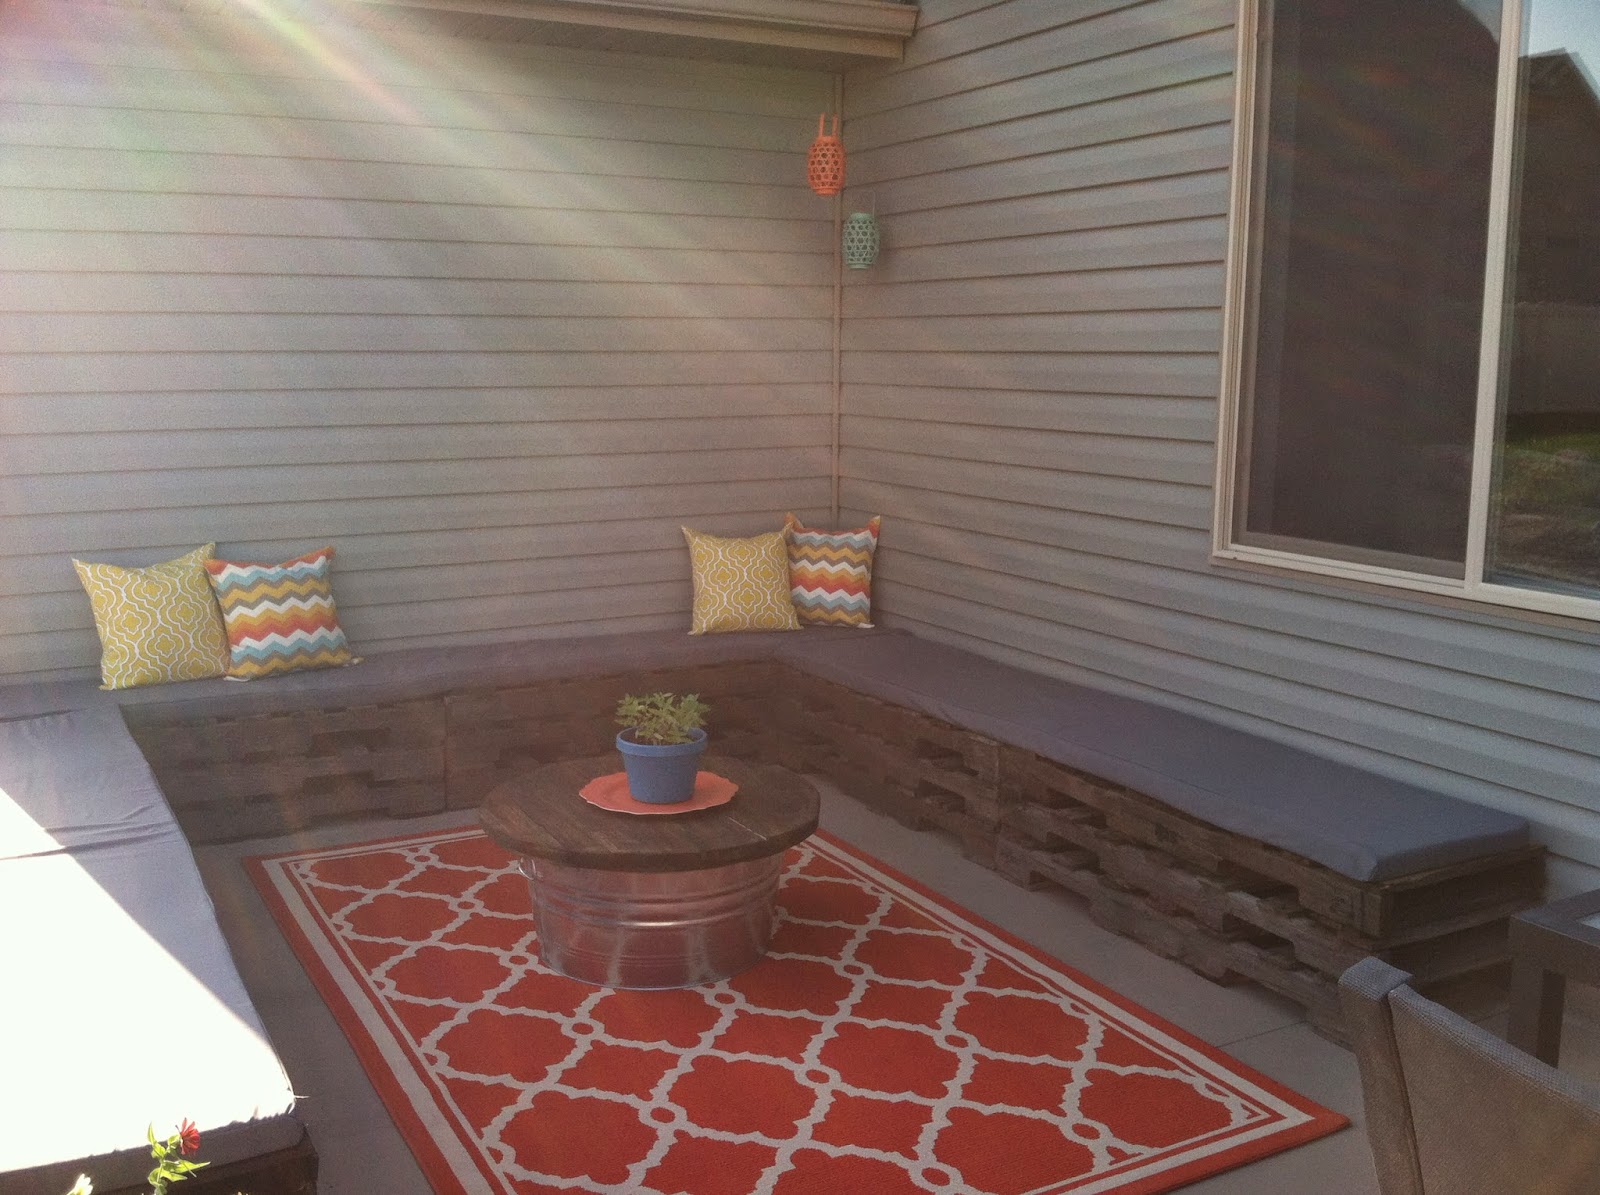
Our Diy Pallet Sectional
Now that summer is over and fall is officially here our pallet sectional is done. When looking at these pictures I have to keep telling myself that next summer is going to be really great. Also our grass is starting to grow which is going to be soooo nice when spring comes. This project took a lot of time but it was so worth it in the end. We actually got our pallets for free (I found them). We tried to pick pallets that were around the same size so that when we cut them in half and stacked them on top of each other they would line up. My husband secured them with his nail gun and we then stained them. We only stained the parts of the pallet you were going to see because this old wood really sucks up your stain and you end up using a lot. The cushions were honestly the hardest part. I purchased outdoor foam from Joanns. Don't buy it full price! It will go on sale and I purchased mine when it was 50% off to save money. I had so much fabric to buy that I purchased it online at Fabricguru.com I know it might not look like this sectional is very big in the picture but that back piece that goes along our house is 10 feet long and the sides are about 9 feet so I was in need of a lot of frabic. My husband had to help me pin and sew the cushion covers because they were so long. I wanted the ability of being able to take the foam out of the cushion covers in case something was to happen in the future. So it's just a big pillow case basically that is velcroed shut. 

This adorable rug is from Walmart if you can believe it! My husband made this awesome coffee table for the center. It is a galvanized bucket we found at IFA he installed sliders inside the top of the bucket so the wood top actually slides open so you can store things inside! I love him (:
I plan to add more pillows next year but other than that it is finished and I can not wait to lay down on this thing with my husband on a warm summer night!
Sunday, September 21, 2014
Master Bedroom
Today I am featuring our master bedroom leave a comment and let me know what you think! I wanted our bedroom to be calm and relaxing so I stuck to neutrals with a few pops of color here and there with pillows and pictures. I also made a few wood signs and I just love how the wood stands out on our white walls. I love mixing metalics with the barnwood to give it a rustic-modern feel.

This sign is one of my favorite things about our room. It represents our wedding date. It was so simple to make and yet it is so meaningful.

This sign is perfect for the bedroom don't you think?
Another super easy project-I bought the clips in the office supply section at walmart and hot glued them to a piece of barnwood I already had. Then I ordered prints from Persnickety Prints I love how they turned out! There so cute with the white boarder around them.
Sunday, September 14, 2014
Living Room
I am constantly adding and changing things through out the living room but here are a few picture of what it looks like at the moment. The sofa & my accent chairs are from The Room Loft so if you like what you see-come visit me there and I can help you out :) The entertainment center is from Ikea. I think what I need next is a big area rug. What do you think? Let's try to talk my husband into it ;)

Gallery Art-Frame it & Hang it!
Let me just share a little secret with you if you have not heard about this awesome product! My Mom and I came across this in Michaels and I was practically jumping up and down in the store. When I find something I love i literally stand in the isle for 10-15 minutes awing over whatever it is. Me & My Big Ideas have a diy gallery art pad that has tons of prints in it for you to instantly make a collage wall.
In the front of the pad they even have examples of collages you can create if you need help with that part. Awesome right!?
In the front of the pad they even have examples of collages you can create if you need help with that part. Awesome right!?
Subscribe to:
Comments (Atom)


